ProConnect HelpIntuit HelpIntuit

EasyACCT Intuit Hosting onboarding and setup guide

by Intuit Updated 1 month ago

Before you start:

  • This article references default installation paths and uses YY to reference the tax year in 20YY format. C: will always indicate the local drive and X: will always indicate the network drive.

Installing EasyACCT Professional / IRS (Information Return System) for use in Rightworks

  • The package assigned to a user (and add-ons, if any) control what's available to install for them.
  • The Account Owner, and users with the role of Account Admin, can install apps for any users that have been assigned a package. They will need to install apps for users with the User (no catalog) role.
  • Users with the User (catalog) role that have been assigned a package can install apps for themselves and will be taken directly to My Apps when they sign in to the portal.
  • The current version of EasyACCT Professional and EasyACCT IRS are available to install when a Lacerte or ProSeries package is assigned to a user. Rightworks will update to the newer version of these programs and roll out updates for the current version after testing them with EasyACCT. They only need to be installed once for a user.
  • EasyACCT Business is not available in the hosted environment.

To install apps for yourself:

  1. Sign in to the Rightworks AppHub.
  2. Select My Apps in the left column.
  3. Go to the Cloud Apps tab.
    • Additional apps are available on the Manual Install Apps tab that can take up to 3 business days before becoming available (the Rightworks Provisioning Team may email asking for additional information needed).
  4. In the Available Applications section, choose Install for all desired programs.
  5. Once an app has been installed, you'll see it in the Installed Applications section.

If you are the Account Owner or Account Admin and want to install apps for your other users:

  1. Sign in to the Rightworks AppHub.
  2. Select Admin Controls.
  3. Go to the Users tab.
  4. Click on the name of the user to be taken to their Apps screen.
  5. Go to the Cloud Apps tab.
    • Additional apps are available on the Manual Install Apps tab that can take up to 3 business days before becoming available (the Rightworks Provisioning Team may email asking for additional information needed).
  6. In the Available Applications section, choose Install for all desired programs.
  7. Once an app has been installed, you'll see it in the Installed Applications section.

EasyACCT files to upload to Rightworks

  • Note your Current Data Path near the top of EasyACCT. This is where your company files are saved.EA1.png
  • Custom Tax Tables are located at C:\EasyW\YYTTBLS.
  • Paid preparer and e-file login information are saved in C:\EasyW\EZSYSW.INI.

Place the contents of the local Current Data Path, the TTBLS folder, and the EZSYSW.INI file in I:\EasyW.

After placing your files, open the EasyACCT program in Rightworks to make sure that the data files are accessible.

IRS files to upload to Rightworks

The default location for IRS company data is C:\IRS20YY\Data.

Place the contents of your local data folder (or other folder where you save your IRS company data) in I:\IRS20YY\Data.

After placing your files, open the IRS program in Rightworks to make sure that the data files are accessible.

How do I move files between the hosted and local environments?

  • When you need to move file(s) from, or to, the hosted environment, smaller files can be copied and pasted.
    • By default, keyboard shortcuts work in the hosted environment when it's maximized.
    • Ctrl+C and Ctrl+V are the copy and paste shortcuts. Alternatively, there are buttons in the Home menu in File Explorer for these functions.
  • Use the Rightworks File Manager site from the local computer to upload or download files when multiple files or larger files are being moved.
    • If the site is failing with a 404 error, clear cache and cookies and restart the browser, try in a different browser, or use an incognito window.
    • Make sure a wired internet connection is being used to better avoid timeouts due to problems with the internet connection.

You can zip locally using the following steps:

  1. Right-click the file or folder and select to Send to.
    • Windows 11 users will need to select Show more options to see this choice.
  2. Choose Compressed (zipped) folder.

To zip in the hosted environment:

  1. Open File Explorer.
  2. Highlight the file or folder.
  3. From the Share menu, click the Zip button.

First, sign in to the Rightworks File Manager. The I:\ drive is selected by default in the left column.

File Manager should be accessed locally, outside the hosted environment.

To upload to the highlighted location in the left column:

  1. Click the blue .
  2. Either drag and drop the file(s) into the Drag and drop files here area, or click Add... and highlight the desired file(s) and click Open.
  3. Once you have the file(s) you want to upload added to the Upload Files window, click Upload.

To download:

  1. In the left column, highlight the drive or folder that contains what you want to download.
  2. On the right, highlight the desired file or folder.
  3. Click the blue and browse to where you want to save the download.

If files were zipped using 7-Zip, call to speak with an Intuit Hosting expert. 

For more information on how to contact Lacerte, as well as our operating hours, see here.

For more information on how to contact ProSeries, as well as our operating hours, see here.

  1. Open File Explorer.
  2. Highlight the zipped folder.
  3. Select the Extract Compressed Folder Tools tab that appears.
  4. Click on the Extract all button.
    file-explorer-extract-all-zipped-folder-or-file.png

Errors received during uploading, or the upload failing, are due to connection instability. These steps require 3rd Party Software to be installed on your computer. Click here for more information on this program before installing.

If your DMS Database is on a server, it can save a lot of time as long as the files are zipped from the server itself. Remote into the server if possible to download 7-Zip and run the zipping process.

Zipping may take a very long time - during this time make sure that your computer does not power off or go to sleep as this will interrupt the process.

  1. Click here to download 7 Zip installer.
  2. Run 7z1900-x64.exe.
    • After clicking the link above, this will usually been seen at the bottom left of your internet browser screen or in your Downloads folder. You can also use Ctrl+J to open the Downloads window in your internet browser.
  3. On the 7-Zip 19.00 (x64) Setup window, leave the default location for your Destination folder then click the Install button.
  4. When the green bar reaches the end it will tell you 7-Zip 19.00 (x64) is installed, click the Close button.
  5. Use File Explorer to browse to your DMS Database.
    • See steps 1-3 in the Zipping section for detailed instructions. You will be re-zipping the same folder as in those steps but this time using 7-Zip to create smaller, easier to upload zipped files.
  6. Right click on the folder you will be zipping then hover your mouse over 7-Zip and choose Add to archive…
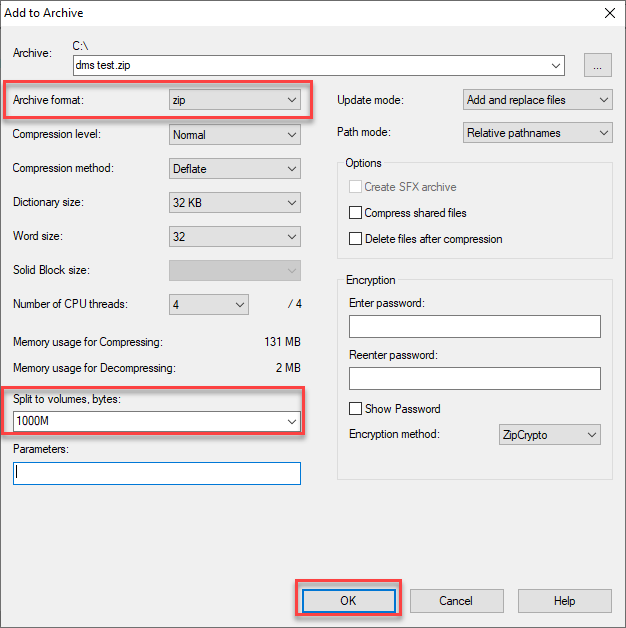
  7. Click on the Archive format drop-down and select zip if not already selected.
  8. Near the bottom left, click on the Split to volumes drop-down and select 1000M.
    2020-11-17_10-45-32.png
  9. Click OK. You will see a progress window displaying the status. This will take some time, depending on the size of the folder.
  10. After this completes you will see the smaller zip files in the same location as the original folder (*.zip.001, *.zip.002, *.zip.003, etc where * is the name of the original folder)
  11. Upload all of these zip files created by 7-Zip. Refer to the Uploading your zipped folder section above for detailed instructions. If the process fails, take note of the last file that successfully uploaded and begin the upload again where you left off.
    • For example: If the upload fails while uploading file 056, you should re-upload files 056 to the end, you don't need to select 001 through 055 again.
  12. Once the upload is complete, you can click the Log Off button in the upper-right corner if additional files don't need to be uploaded at this time.
Intuit EasyACCT 2020Rightworks

Sign in now for personalized help

Ask questions, get answers, and join our large community of Intuit Accountants users.

Dynamic AdsDynamic Ads