ProConnect HelpIntuit HelpIntuit

How to show aggregation of business operations Section 1.199A-4 in Lacerte

by Intuit Updated 2 months ago

This article will explain how to link your business income to show aggregation of business operations as discussed in Section 1.199A-4 and provide an explanatory statement.

For more Schedule C resources, check out our Tax topics page for Schedule C where you'll find answers to the most commonly asked questions.

  1. Go to your first business:
    • Screen 16, Business Income (Schedule C)
    • Screen 18, Rental & Royalty Income (Schedule E)
    • Screen 19, Farm Income (Schedule F / Form 4835)
    • Screen 20.1, Partnership Information
    • Screen 20.2, S Corporation Information
    • Screen 20.3, Estate and Trust Information
  2. Within the business activity, locate the applicable section:
    • Screen 16, Qualified Business Income Deduction
    • Screen 18, Qualified Business Income Deduction
    • Screen 19, Qualified Business Income Deduction
    • Screen 20.1, Line 20 - Other
    • Screen 20.2, Line 17 - Other Information
    • Screen 20.3, Line 14 - Other Information
  3. Enter a 1 in the following field to indicate your first aggregate business:
    • Screen 16, Aggregate Tax Identification Number (code 453)
    • Screen 18, Aggregate Tax Identification Number (code 450)
    • Screen 19, Aggregate Tax Identification Number (code 453)
    • Screen 20.1, Section 199A (20Z - 20AB) Aggregate Tax Identification Number (code 1152)
    • Screen 20.2, Section 199A (17V - 17X) Aggregate Tax Identification Number (code 1152)
    • Screen 20.3, Section 199A (14I) Aggregate Tax Identification Number (code 1152)
  4. Enter a description in the following field to explain how these businesses are allowed to be aggregated:
    • Screen 16, Description of aggregated businesses and explanation of how they are allowed to be aggregated. (CTRL+E) (455)
    • Screen 18, Description of aggregated businesses and explanation of how they are allowed to be aggregated. (CTRL+E) (452)
    • Screen 19, Description of aggregated businesses and explanation of how they are allowed to be aggregated. (CTRL+E) (455)
    • Screen 20.1, Explanation of Aggregation (code 1160)
    • Screen 20.2, Explanation of Aggregation (code 1160)
    • Screen 20.3, Explanation of Aggregation (code 1160)
  5. Repeat steps for each additional business activity to be included in Aggregate Tax Identification Number 1.
    • The explanation only needs to be entered once for each aggregated business income grouping.

To create a second aggregate business grouping, repeat steps, marking as Aggregate Tax Identification Number 2.

  1. Go to your first business:
    • Screen 21, Business Income (Schedule C)
    • Screen 23, Rent & Royalty (Schedule E)
    • Screen 24, Farm (Schedule F)
    • Screen 25, Passthrough K-1s
  2. Within the business activity locate the applicable section:
    • Screen 21, Qualified Business Income Deduction
    • Screen 23, Qualified Business Income Deduction
    • Screen 24, Qualified Business Income Deduction
    • Screen 25, Other (20)
  3. Enter a 1 in the following field to indicate your first aggregate business:
    • Screen 21, Aggregate Tax Identification Number (code 453)
    • Screen 23, Aggregate Tax Identification Number (code 453)
    • Screen 24, Aggregate Tax Identification Number (code 451)
    • Screen 25, Section 199A - Aggregate Tax Identification Number (code 1152)
  4. Enter a description in the following field to explain how these businesses are allowed to be aggregated:
    • Screen 21, Description of aggregated businesses and explanation of how they are allowed to be aggregated. (CTRL+E) (455)
    • Screen 23, Description of aggregated businesses and explanation of how they are allowed to be aggregated. (CTRL+E) (455)
    • Screen 24, Description of aggregated businesses and explanation of how they are allowed to be aggregated. (CTRL+E) (453)
    • Screen 25, Section 199A - Explanation of Aggregation (code 1160)
  5. Repeat steps for each additional business activity to be included in Aggregate Tax Identification Number 1.
    • The explanation only needs to be entered once for each aggregated business income grouping.

To create a second aggregate business grouping, repeat steps marking as Aggregate Tax Identification Number 2.

When aggregating Schedule E income, and making the Safe Harbor election you'll want to avoid producing an election for each of the activities in the aggregated grouping.

  1. Go to the Schedule E screen.
    • Individual: Screen 18, Rental & Royalty Income (Schedule E)
    • Fiduciary: Screen 23, Rent & Royalty (Schedule E)
  2. Scroll down to the Qualified Business Income Deduction section.
  3. Select the box for Claiming safe harbor on rental real estate per IRS Notice 2019-07.
    • This should only be selected on one of the activities in the grouping. In the left panel, select the next activity within this aggregate grouping.
  4. Within the Qualified Business Income Deduction section, enter a 1 in the field for Business is a qualified trade or business: 1=yes, 2=no [O].
    • When you select the safe harbor election, this signifies the activity as a qualified trade or business. Marking a yes here, satisfies this requirement while preventing safe harbor election statements to be generated for every activity within the aggregate grouping.

To make an election for a second aggregate business grouping, repeat steps.

Forms view and filing the return

Worksheets Schedule B - Aggregation of Business Operations

Once complete, the aggregate income will be displayed in Forms view within the Worksheets. Each aggregate grouping will be listed separately. Example: Aggregation 1, Aggregation 2, etc.

The Schedule B - Aggregation of Business Operations worksheet is automatically included as a statement with the e-filing of the tax return. The Lacerte options to Auto Generate and Attach PDFs to E-Files should be set to yes for this to occur.

If you are on a network, you'll want to check both local and primary options.

  1. Go to the Settings dropdown menu.
  2. Select Options (network also select Primary Options).
  3. Select the Setup tab.
  4. Make sure Auto Generate and Attach PDFs to EFiles is set to Yes.
  5. Select OK to save and close the window.

Once the e-file has been created within the e-file wizard, the following information will be displayed on the General Information page in Forms view.

Sample image of General Information page
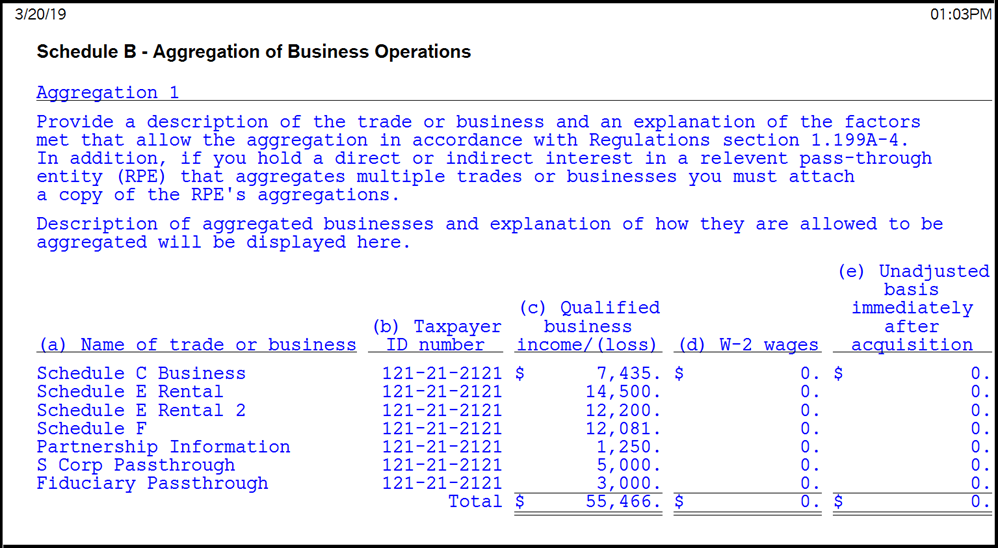

Image of Lacerte Individual Worksheet - Schedule B - Aggregation of Business Operations

Lacerte Tax 2019Lacerte Tax 2020Lacerte Tax 2021

Sign in now for personalized help

Ask questions, get answers, and join our large community of Intuit Accountants users.

Dynamic AdsDynamic Ads