Create and update your clients' tax returns with Prep for taxes in ProConnect Tax
by Intuit• Updated 4 months ago
Learn how to use Prep for taxes to create and update your clients' tax returns in ProConnect Tax.
Tax preparers now have the ability to review, reconcile, reclassify, and remap tax mappings as needed prior to bringing in the books data in to ProConnect Tax.
Here’s how to use Prep for taxes to get your clients ready for tax season.
Table of contents:
Open Prep for taxes
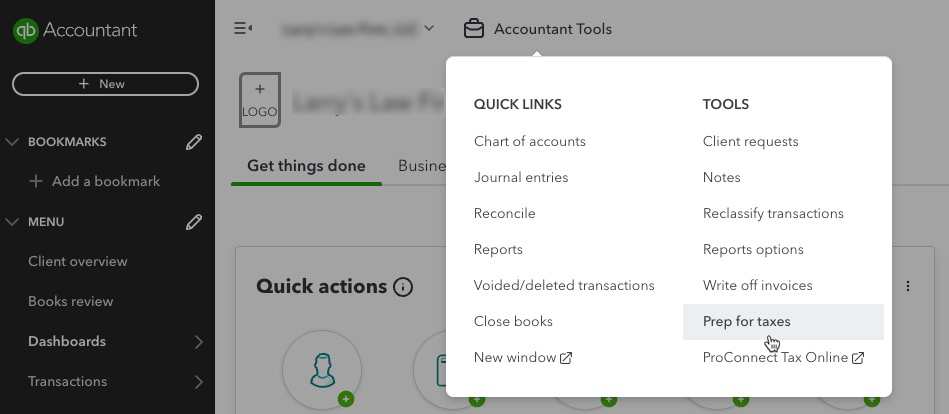
- From ProConnect Tax, select
 from the main navigation bar.
- QuickBooks Accountant will open in a new tab.
- Once in QuickBooks Accountant, go to the client's book.
- From there, go to Accountant Tools and under the Tools submenu, select Prep for taxes.
- On the Tax Mapping tab, under the Select your professional software dropdown, select Intuit ProConnect Tax.
- From the Select a tax form dropdown, select the client's tax return type.
- Once those selections are made, go to Tax options and select from the following:
- Create new return
- Update existing return
This will take you back to ProConnect Tax where you'll be greeted by the following message:
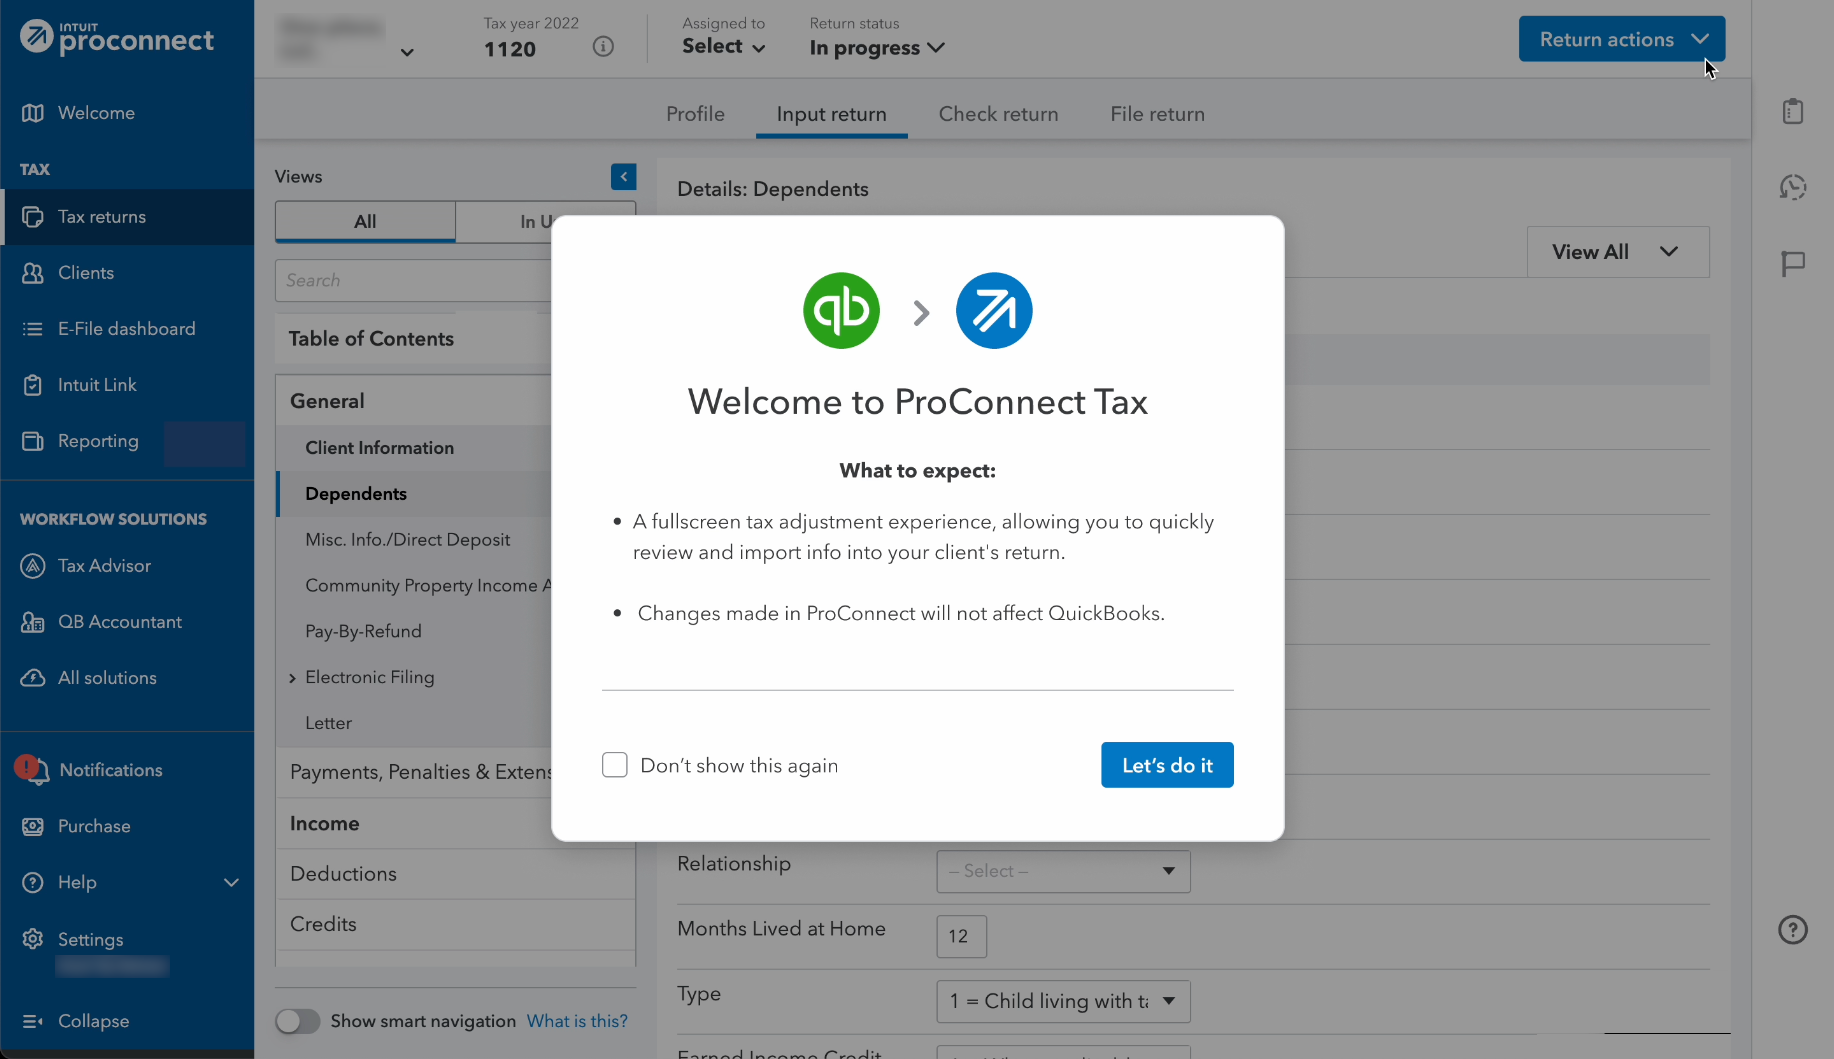
Once you select Let's do it, you'll be taken to the Book to tax adjustments screen.


Return to Prep for taxes experience
Once the info is pushed from QuickBooks Online Account to ProConnect Tax, you can either:
- complete all your import work at that time (or)
- return at a later time to finish importing.
To return to the Prep for taxes experience, you may do so by either:
- under the Actions column for that return, selecting Book to tax import from the picklist (or)
- under the Data column for that return, selecting
 .
.
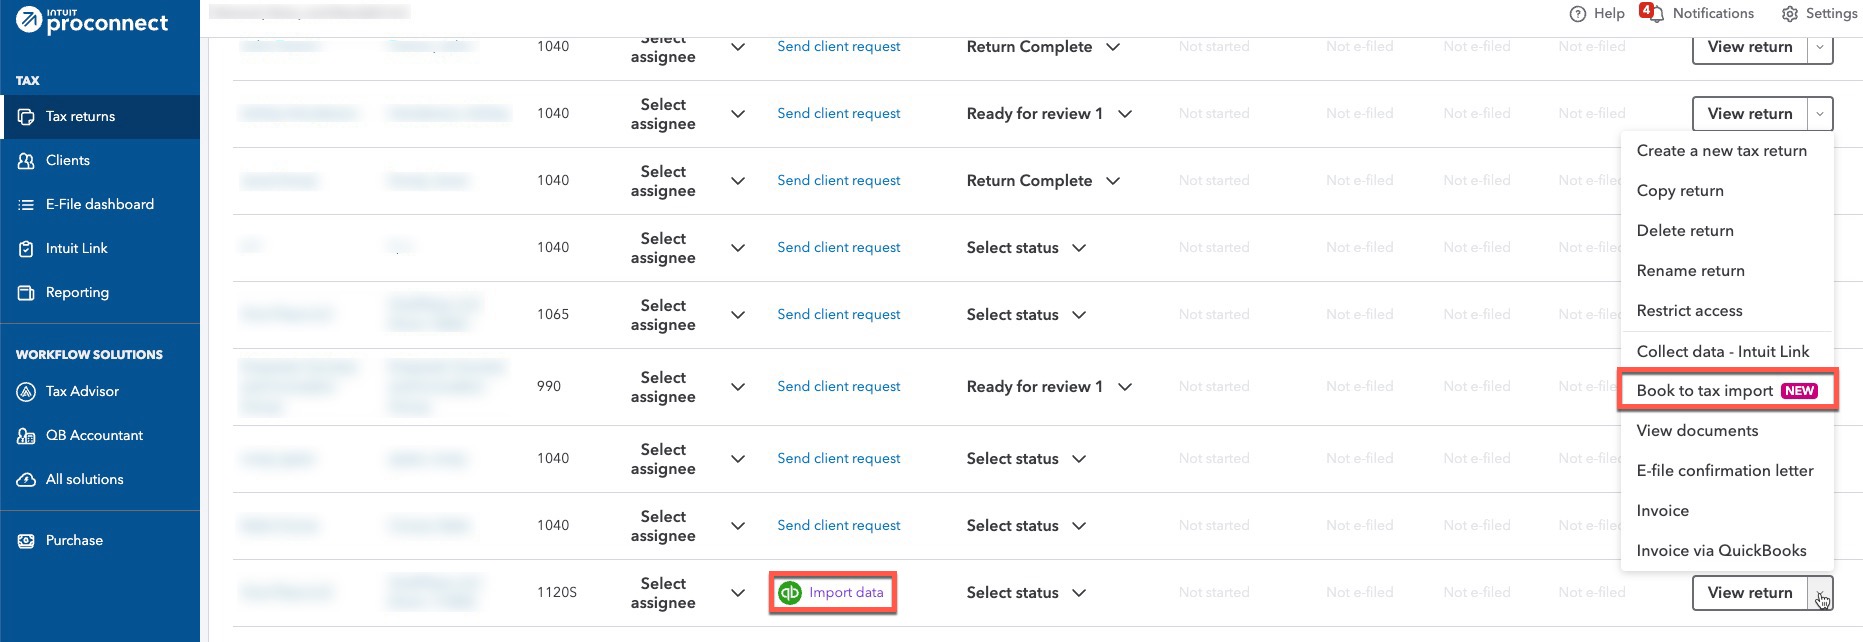
These options only be available after the initial push covered in Open prep for taxes has been completed.
Once the data has been imported, the Data icon will switch from to  .
.
Should there by any subsequent update that is pushed from QuickBooks Online Accountant to ProConnect Tax with new data, the icon will then shift to inform users there's a new update available to bring in.
When you're bringing in a new QuickBooks Online Account update, you will notice this messaging along the top of the Book to Tax adjustments screen:

This message is informative in nature, and no new QuickBooks Online Accountant info is brought over automatically. You can opt to review the data last used to update ProConnect Tax, and from there decide if you want to bring in the latest QuickBooks Online Accountant update.
Books to Tax adjustments
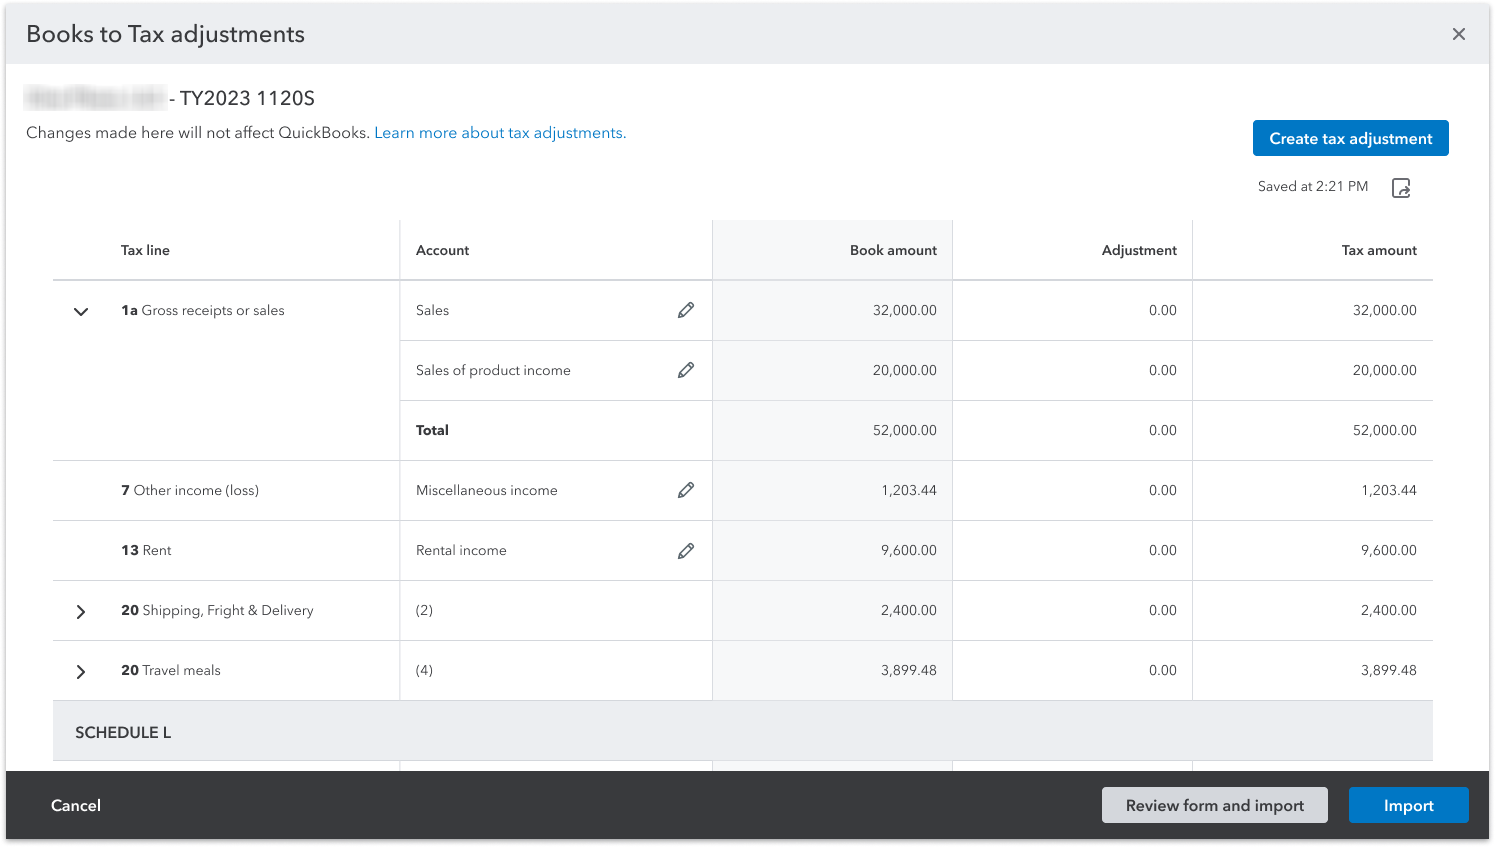
| Tax line | Account | Book amount | Adjustment | Tax amount |
| Shows the tax line. | Editable, where you use the pencil icon to edit the tax line mapping, if needed. | Read-only, showing the book data from QuickBooks Accountant. | Adjusts to reflect the difference between the Books amount and Tax amount column. | Adjusts to show the result of the Books amount and any Adjustment made. |
![]() Changes made by the tax preparer in ProConnect Tax will not impact the QuickBooks Accountant data at the bookkeeper level, and serve only to complete the tax return.
Changes made by the tax preparer in ProConnect Tax will not impact the QuickBooks Accountant data at the bookkeeper level, and serve only to complete the tax return.
This screen acts as a review layer, which gives you as the tax preparer control over the books data after the bookkeeper handoff. From here you can:
- Edit tax line mapping
- Create tax adjustment(s)
- Edit tax adjustment(s)
- Download the workpaper as a .CSV
After making any needed changes, depending on what you want to do, select either Review form and import to review the numbers alongside the tax forms before importing, or Import to either create or update the tax return. Once completed, you'll be taken to the Client Information screen of their tax return.
Edit tax line mapping
- From the Account column, choose the line you'd like to edit by selecting its pencil icon.
- In the Edit tax line mapping window, you will be shown the following information:
- Account
- Type
- Total
- Below that information, From will show you the current line number and under the To dropdown is where you would choose the target tax line.
- Once you have selected the target tax line, select Save.
This will take you back to the Book to tax adjustments screen.
Create tax adjustments
Tax adjustments are made by way of journal entry at the tax preparer level. For each line item, you can assign an Account, enter any Debits and Credits, as well as provide a Description.
Along the top of the screen you'll see an account snapshot. This snapshot will show you the Book amount, Adjustments, and Tax amount for the Account you've selected, based on the line item you're working on.
Next to the account snapshot, you'll see a field where you can assign a Tax adjustment journal entry no. This can be helpful for tracking purposes.
In the event that the tax adjustment you're making is strictly for informational use only, you can select the Documentation purposes only box. With this checkbox marked, any tax adjustments made on the journal entry won't impact the tax return.
Edit tax adjustments
You can edit your tax adjustments at two levels:
- Account level
- Global level
Account-level tax adjustments can be started by selecting its pencil icon in the Adjustments column. From there, you'll be taken to a view that shows all tax adjustments for that account.
Global-level tax adjustments can be started by select the down-arrow by Create tax adjustment, selecting Edit tax adjustment. This will take you to a view that shows you all tax adjustments. If you need to transition to an account-level adjustment from this view, you can do so by using the Search by account field.
From the Actions column on either level, you can either Edit or Delete the tax adjustment.
To go back to the Book to tax adjustments screen, you can either select Go back to save any changes made, or Cancel to discard them.
 Download workpaper as .CSV
The workpaper details all tax adjustments and each tax-adjusting transaction, which is useful for tracking purposes.

To download the workpaper, select the paper icon below the Create tax adjustment button. From here, the workpaper will be downloaded as a .CSV
Review form and import

If needed, you have the option to review the numbers against the tax return forms. From the Book to Tax adjustments screen, select Review and import.
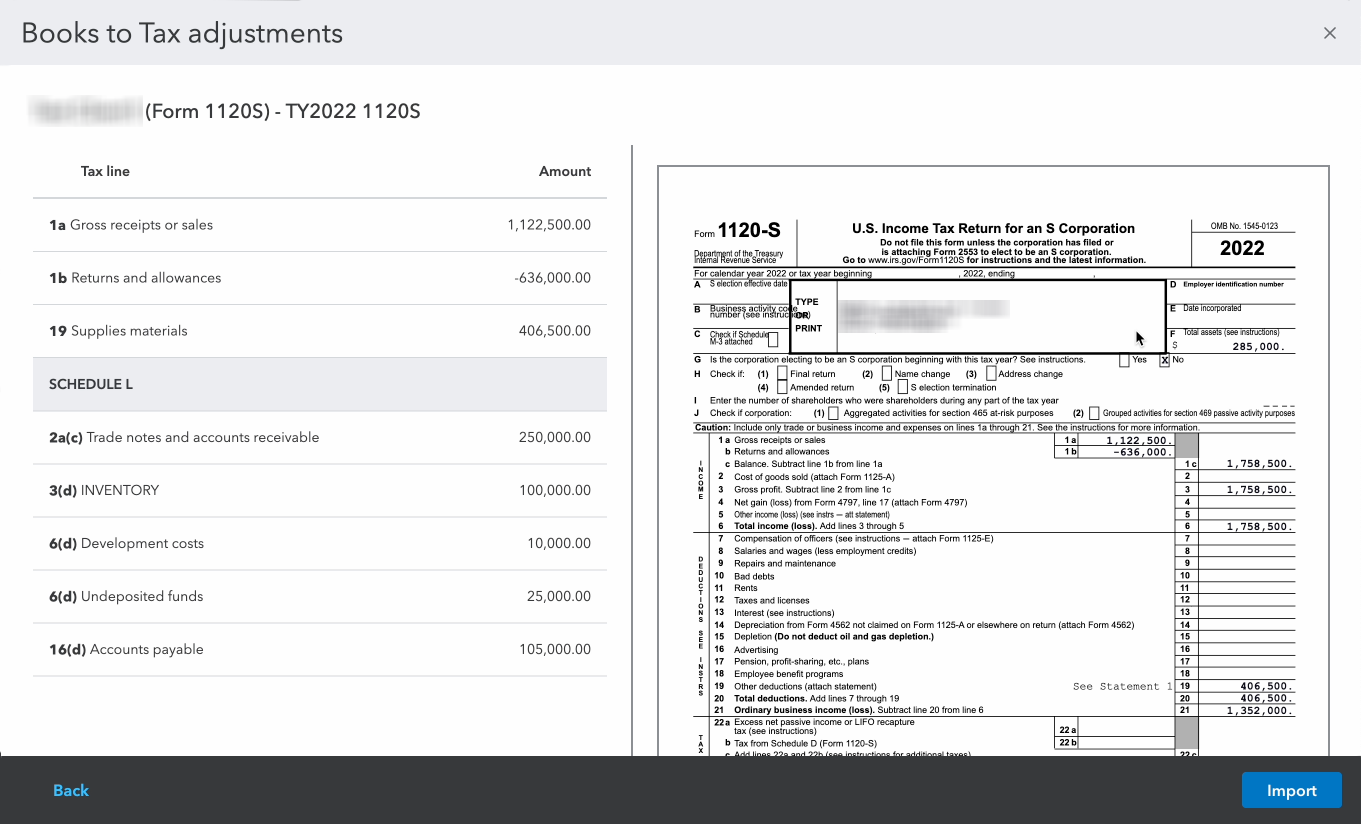
In this view, you can compare the numbers you are importing against the tax lines of the form, allowing you to confirm tax line mappings while reviewing the tax return as it will appear after you select Import.
Sign in now for personalized help
Ask questions, get answers, and join our large community of Intuit Accountants users.
